醬是創客的WebThings教學主題第5篇,以WebThings搭配Ai-Thinker安信可NodeMCU-32S(Arduino語言)來實作教學,本篇教學將著重使用ESP32與Arduino WebThings Framework整合,並透過ESP32抓取TH485 modbus溫濕度感應器拋往WebThings Gateway,達到Client拋送溫度與濕度資訊到Server功能
以下是我們今天的目標
- 定義溫度與濕度感應器的Types(TemperatureSensor, HumiditySensor)
- 了解WebThingAdapter的更新方法
- ThingDevice定義該設備定義(開關、溫度、濕度……等)、描述、名稱、網址ID
- ThingProperty定義多個Sensor屬性(TemperatureProperty,HumidityProperty)
- ThingPropertyValue定義為Sensor數值
設備:
樹莓派4B #露天拍賣 #蝦皮購物
安信可NodeMCU-32S #露天拍賣 #蝦皮購物
TTL485轉換板 #露天拍賣 #蝦皮購物
TH485溫溼度板 #露天拍賣 #蝦皮購物
接線方式:
NodeMCU-32S(3.3V或5V)—-TTL485轉換板(VCC)
NodeMCU-32S(GND)—-TTL485轉換板(GND)
NodeMCU-32S(GPIO17設為TX2)–TTL訊號–TTL485轉換板(RXD)
NodeMCU-32S(GPIO16設為RX2)–TTL訊號–TTL485轉換板(TXD)
TTL485轉換板(A/D+)–線–TH485(A)
TTL485轉換板(B/D-)–線–TH485(B)
DC 12V(+)–TH485(+)
DC 0V(-)–TH485(-)
TH485溫溼度設備Modbus RTU規格:
溫度: InputRegisters,0x0001,0.1C
濕度: InputRegisters,0x0002,0.1H
Buad Rate: 9600,N,8,1
Slave ID: 1
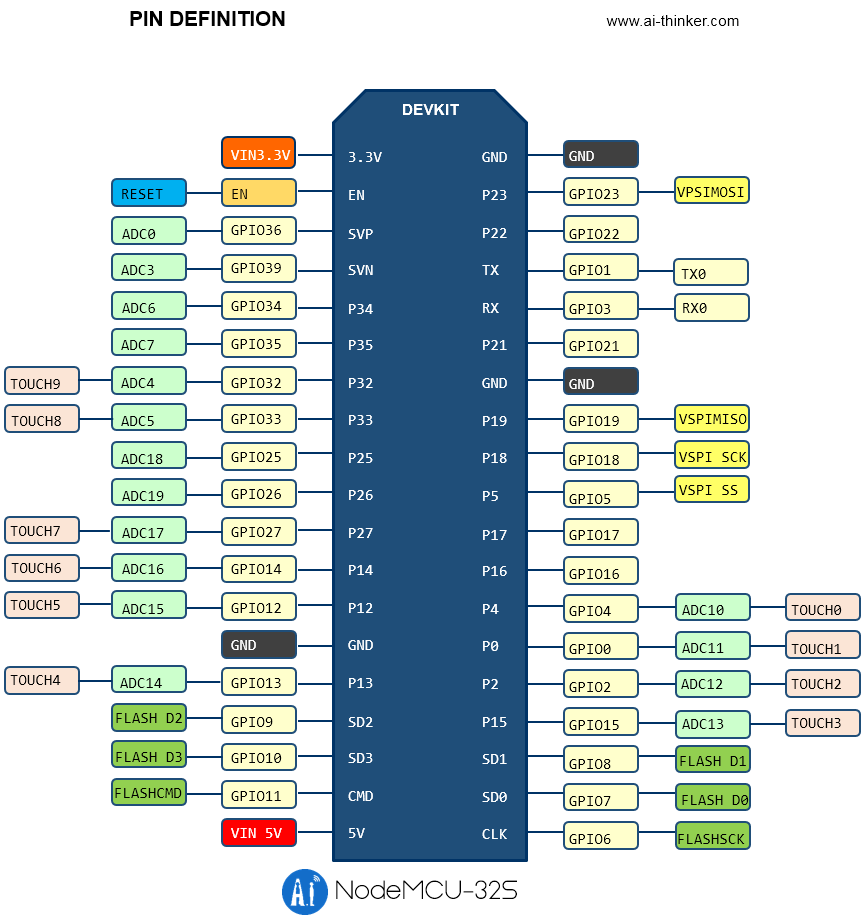
Ai-Thinker安信可NodeMCU-32S的腳位圍(資料來源:安信可)
Arduino 範例程式碼如下
//醬是創客 開發實作的好夥伴
#define LARGE_JSON_BUFFERS 1
#define RXD2 16
#define TXD2 17
#include <WiFi.h>
#include <Thing.h>
#include <WebThingAdapter.h>
#include <ModbusMaster.h>
//SSID/PW
const char *ssid = "iot";
const char *password = "chosemaker";
// ModbusMaster object
ModbusMaster node;
uint8_t result;
uint16_t data[2];
//WebThings
WebThingAdapter *adapter;
const char *temphumTypes[] = {"TemperatureSensor", "HumiditySensor", nullptr};
ThingDevice temphum("chosemaker-temp-hum-1", "", temphumTypes);
//溫度
ThingProperty sensorTemp("temp", "", NUMBER, "TemperatureProperty");
ThingPropertyValue tempVal;
//濕度
ThingProperty sensorHumd("hum", "", NUMBER, "HumidityProperty");
ThingPropertyValue humVal;
void setup()
{
Serial2.begin(9600, SERIAL_8N1, RXD2, TXD2);
// Modbus slave ID 1 使用 Serial2
node.begin(1, Serial2);
Serial.begin(115200);
WiFi.begin(ssid, password);
while (WiFi.status() != WL_CONNECTED) {
delay(500);
Serial.print(".");
}
Serial.println("");
Serial.print("Connected to ");
Serial.println(ssid);
Serial.print("IP address: ");
Serial.println(WiFi.localIP());
//WebThings
adapter = new WebThingAdapter("temp-hum", WiFi.localIP());
temphum.title = "chosemaker Tempe and Hum";
temphum.description = "chosemaker's Temperature and Humidity";
//溫度
sensorTemp.title = "Temp";
sensorTemp.unit = "degree celsius";
sensorTemp.readOnly = "true";
temphum.addProperty(&sensorTemp);
//濕度
sensorHumd.title = "Hum";
sensorHumd.unit = "percent";
sensorHumd.readOnly = "true";
temphum.addProperty(&sensorHumd);
//WebThingAdapter
adapter->addDevice(&temphum);
adapter->begin();
Serial.println("HTTP server started");
Serial.print("http://");
Serial.print(WiFi.localIP());
Serial.print("/things/");
Serial.println(temphum.id);
}
void loop()
{
//WebThingAdapter
adapter->update();
//InputRegister 0x0001~0x0002
result = node.readInputRegisters(0x0001, 2);
if (result == node.ku8MBSuccess)
{
//溫度InputRegister 0x0001
data[0] = node.getResponseBuffer(0);
tempVal.number = data[0] * 0.1;
//濕度InputRegister 0x0002
data[1] = node.getResponseBuffer(1);
humVal.number = data[1] * 0.1;
}
//Set Value
sensorTemp.setValue(tempVal);
sensorHumd.setValue(humVal);
delay(2000);
}
Arduino 序列埠監控視窗 輸出如下
..
Connected to iot
IP address: 192.168.2.179
MDNS responder started
HTTP server started
http://192.168.2.179/things/chosemaker-temp-hum-1
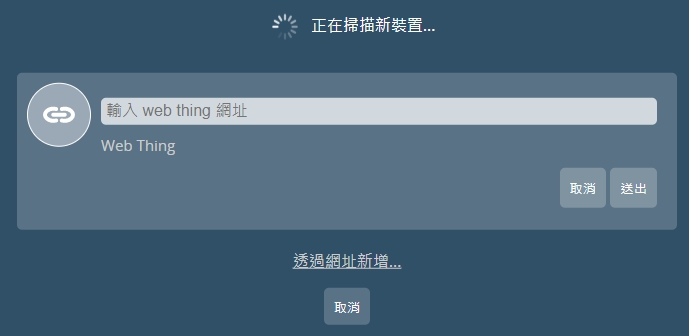
我們打開登入樹莓派的WebThings Gateway,在儀錶板的右下角點擊”+”並於”輸入web thing網址”輸入http://192.168.2.179/things/chosemaker-temp-hum-1,並儲存
此時我們也可以連入http://192.168.2.179/things/chosemaker-temp-hum-1 ,可以看到這是一個JSON文件,Server於第一次取得設定檔時會連到Client抓取JSON回去對應欄位
{"id":"chosemaker-temp-hum-1","title":"chosemaker Tempe and Hum","@context":"https://iot.mozilla.org/schemas","description":"A web chosemaker Temperature and Humidity","base":"http://192.168.2.179/","securityDefinitions":{"nosec_sc":{"scheme":"nosec"}},"security":"nosec_sc","@type":["TemperatureSensor","HumiditySensor"],"links":[{"rel":"properties","href":"/things/chosemaker-temp-hum-1/properties"},{"rel":"actions","href":"/things/chosemaker-temp-hum-1/actions"},{"rel":"events","href":"/things/chosemaker-temp-hum-1/events"},{"rel":"alternate","href":"ws://192.168.2.179/things/chosemaker-temp-hum-1"}],"properties":{"hum":{"type":"number","readOnly":true,"unit":"percent","title":"Hum","@type":"HumidityProperty","links":[{"href":"/things/chosemaker-temp-hum-1/properties/hum"}]},"temp":{"type":"number","readOnly":true,"unit":"degree celsius","title":"Temp","@type":"TemperatureProperty","links":[{"href":"/things/chosemaker-temp-hum-1/properties/temp"}]}}}
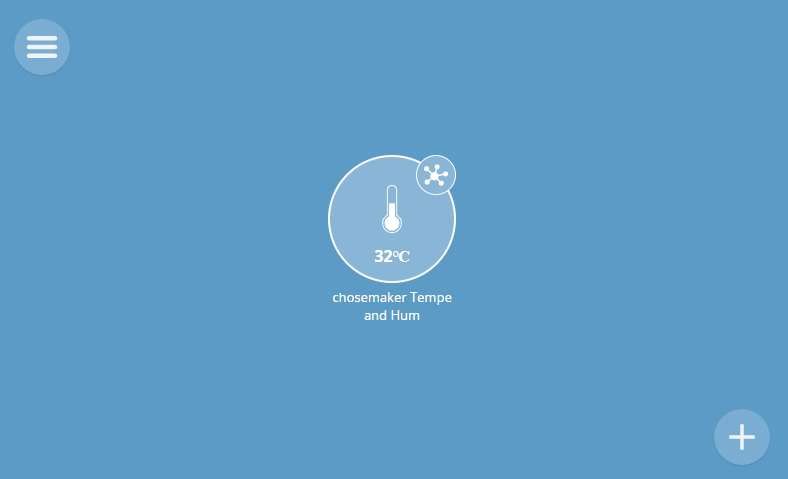
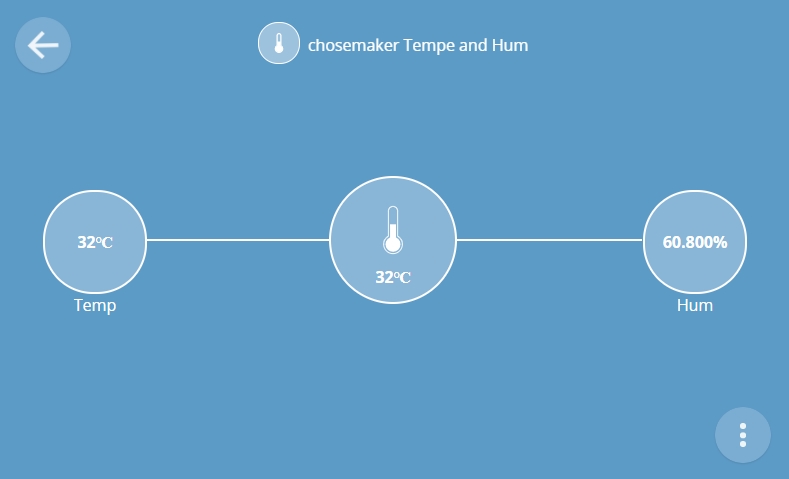
在儀錶板的位置即可以看到加入的chosemaker Tempe and Hum設備,可以點擊該右上角小圖式打開可以看到溫度與濕度,我們預設讓溫度顯示排在最前面